We’ve talked about getting your Twitter page verified in a previous blog post, and how this simple blue check mark can help your business in a number of positive ways. But did you know that you can also get your Facebook business page verified? Here’s something even better: it’s much easier and faster to accomplish than getting a Twitter account verified.
Getting your Facebook page verified shows your customers that you’re the real deal legitimate business they’re looking for, and helps you to get found more easily in Facebook’s search function.
Here are a few simple steps to get your page verified.
Facebook Business Page
The first thing you need to do is to log in to your Facebook account and go to your business’s Facebook Page. If you don’t currently have a page setup for your business, go ahead and do so now. If you’re setting your page up for the first time, be sure to mark it as a Local Businesses or Companies & Organizations in the category section. This is the best categorization for your Facebook Page as a business owner, and Facebook will only let you verify your page if you are labeled under one of these two categories.
Go To Settings
Next, you’ll need to go to your Facebook Page’s settings, located at the top of your page on the right-hand side. Your settings should open up in the General section, but if it doesn’t, click on General in the options in the left side column.
Page Verification
You should see an option for Page Verification, the third option in the list of General settings. If you don’t see this option, make sure your Page is categorized under Local Businesses or Companies & Organizations. You can always change your category by going to the About section of your Page, and clicking on Edit Page Info. You can select your Category in the third option in Edit Page Info.
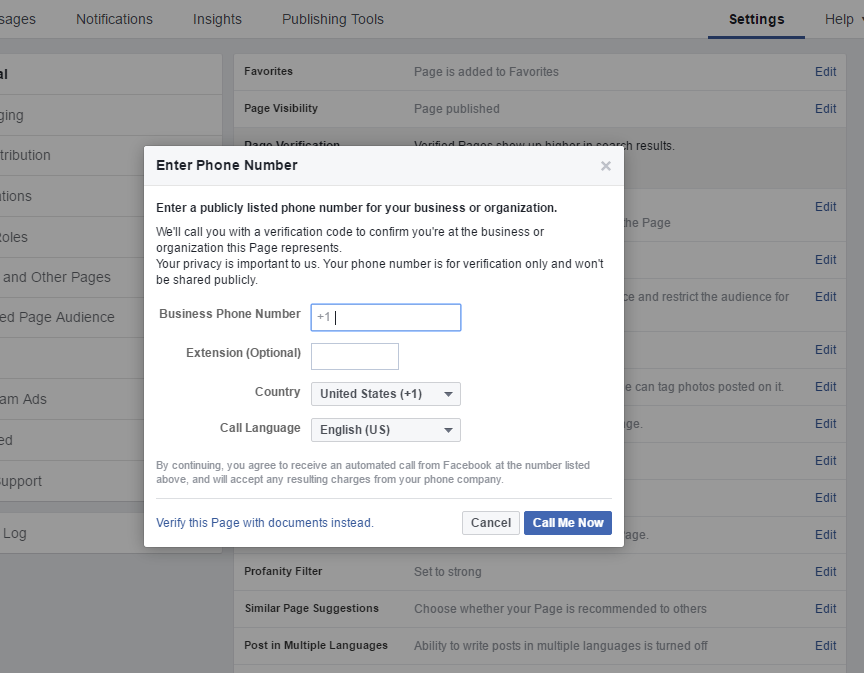
Click on Edit next to Page Verification, and then click on Verify this Page. A new box will open up that will allow you to verify your page in one of two ways.
Get Your Check Mark
There are two ways you can verify your page. The first way is to have Facebook call you and give you a verification code. In order to use this way you have to make sure you are a business that has a local phone listing, and you have somebody who can immediately answer the call because Facebook’s automated phone service will call you right away. When they call, an automated voice will repeat a 4-digit code to you. Enter the code, and if Facebook recognizes you as a business, they will verify your page.
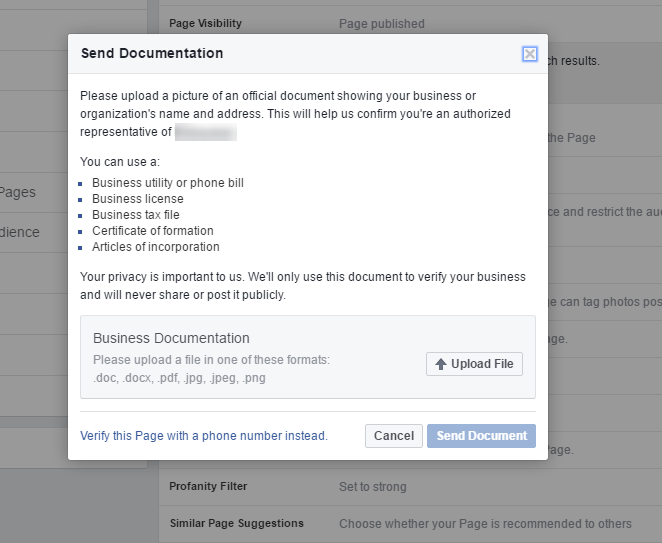
The second way requires you to upload a picture of an official document for your business. It has to be one that how’s your business or organization’s name and address. Facebook lists a few different documents you can upload:
- Business utility or phone bill
- Business license
- Business tax file
- Certificate of formation
- Articles of incorporation
Facebook assures you that they will only use the documents to verify your business and won’t share or post it publicly. Once the document is uploaded, you’ll have to wait on Facebook to get back to you and verify that your business is real. Note that the document you upload must be one of these file types:
- .doc
- .docx
- .jpg
- .jpeg
- .png
That’s it! Pretty simple, right? Take the necessary steps to get your Facebook page verified today, and starting reaping the benefits!
For more info on Facebook’s verification process, check out their official Help Center.

